Install Android 8.0 Oreo-based Lineage OS 15 ROM on Moto Z Play (Addison) smartphone. The Moto Z series is the company’s new flagship range, replacing the X series models. Moto Z Play launched with a new mod: the Hasselblad True Zoom camera gives this Motorola handset a look and feels like a real camera with 10X zoom and physical controls.
Moreover, its specs include Android 6.0.1 Marshmallow OS, 2 GHz Octa-core Cortex A53 processor, and 3 GB of RAM with 32 GB of internal storage. It comes with 16 megapixels of primary camera on the rear with dual-LED flash and 5 megapixels of front camera for selfies. Motorola upgraded the OS to Android 7.1.1 Nougat and has even planned to further upgrade it to the latest Android 8.0 Oreo.
But it will take more time and till then you can enjoy the Android Oreo OS by flashing this beautiful Lineage OS 5 custom ROM which has been recently compiled by Alberto97, a recognized developer from the well known XDA community. All credit goes to his great efforts because now the users can finally enjoy and experience the latest Android 8.0 Oreo on their smartphones.
This ROM not only gives a complete Android Oreo feel to your Moto Z Play, but also boosts the entire performance of your device with the new features, apps, and capabilities that it has. With this amazing custom firmware, you can easily optimize as well as customize the system settings located in your phone.
The ROM not only makes the device look cool with its beautiful interface, blazing speed, and various extra features but also helps the device to gain more speed along with improved battery life. The various working features in this ROM are given below. Note that this Android 8.0.0 Oreo-based lineage OS 15 is in its initial stage, so you may come across a few bugs or issues. But don’t worry as all those bugs will get wiped out in the next stable update.
How to Install Lineage OS 15 ROM on Moto Z Play
If you want to experience the amazing features of Android Oreo on your Motorola Moto Z Play (Addison) smartphone then go ahead to our actual tutorial given below.
Disclaimer
The given tutorial is of many risks and even a slight change can highly damage your Moto Z Play. So follow each and every step at your own risk. If your phone gets crashed or anything happens to your device which is not fixable, then neither we at DroidThunder.com nor the developers will be held responsible for that.
Compatibility
This Android 8.0 Oreo-based Lineage OS 15 ROM must be installed only on Motorola Moto Z Play (Addison) / Moto Z Play Droid. Using this guide on any other device or variant can permanently damage or even brick your phone. Hence, confirm your device first and then go further.
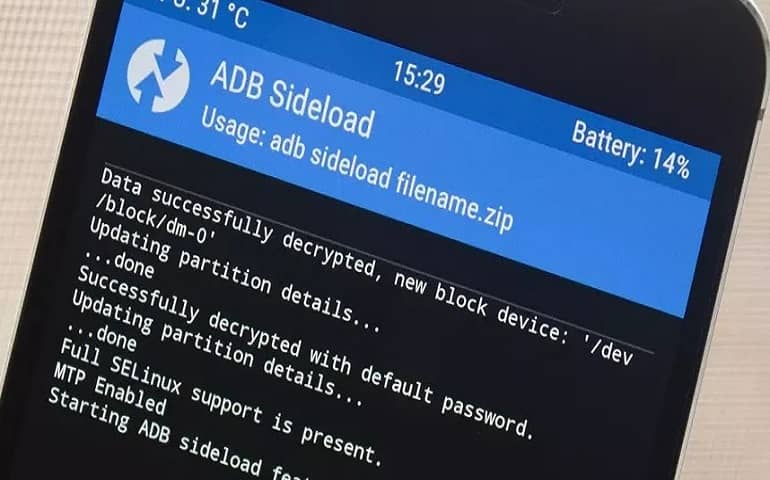
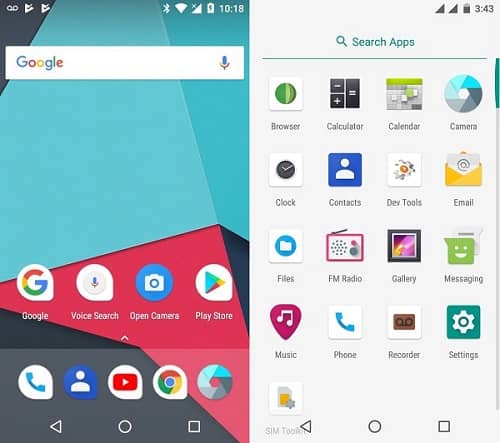
Screenshots
Pre-Requisites
- Charge your Moto Z Play to a minimum of 60%.
- Make a complete backup of your phone including your contacts, apps, messages, call logs, memos, APN settings, etc. for safety.
- Ensure that Motorola mobile-specific USB drivers are installed on your computer.
- Besides, unlock the bootloader of your Android phone.
- Also, root and install the latest TWRP recovery on Moto Z Play.
- Finally, enable the USB debugging mode on your phone.
Downloads
Steps to install Lineage OS 15 ROM on Moto Z Play
- Download both the Lineage OS 15 ROM and GApps (.zip) package files on your PC.
- Do not extract these zip files.
- Connect your phone to PC and copy both these zip files on your phone’s internal memory.
- If you don’t have a PC, then you can directly download the zip files on your phone.
- Power off your Moto Z Play completely until it vibrates.
- After that, you need to boot your phone into bootloader mode.
- For that, press and hold Volume down key + Power button simultaneously until your Moto Z Play lands into bootloader mode.
- In bootloader mode, Volume buttons are used for scrolling and the Power button for selection.
- So use the Volume down key and navigate to Recovery mode option and then select it using the Power button.
- As soon as you press the Power button your phone will automatically boot into TWRP recovery mode.
- The first thing you need to do is to take a complete Nandroid backup of your current ROM.
- Go back to the main menu of TWRP recovery and select the Wipe option.
- On the next screen swipe right to start the factory reset process.
- This step will delete the data on your phone memory so make sure you have backed up everything before doing this step.
- After wiping out everything press the back button and again select the Wipe option.
- Then click on the Advanced Wipe option present there.
- On the next screen, select the particular partitions to wipe.
- Do not tick the Internal Storage option.
- Then swipe right to start the wiping process.
- Let’s install the Lineage ROM now. So go back and select the Install option from the TWRP main menu.
- This will show you all the files and folders present on your phone’s memory.
- Select the Android 8.0 Oreo-based Lineage OS 15 ROM which you’ve copied earlier.
- On the next screen just swipe right to start the actual Android 8.0 Oreo ROM flashing process.
- Be patient and wait for a few minutes until the process finishes.
- As soon as it completes, you’ll see a successful message on the screen.
- Then go back and install the Google Apps zip package file.
- Now restart your Moto Z Play by selecting the Reboot > System option present on the TWRP recovery mode itself.
- The first boot will take more time to start than usual.
Conclusion
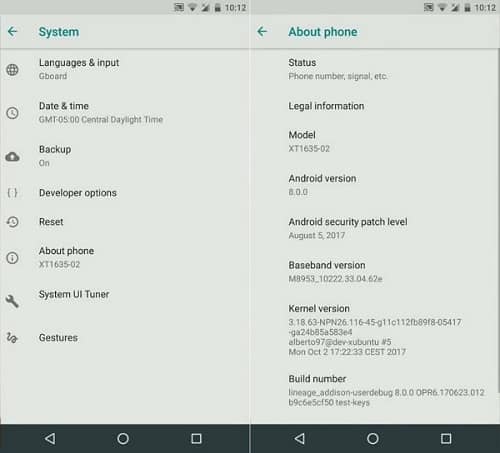
Finally! The all-new Android 8.0.0 Oreo-based Lineage OS 15 custom ROM is successfully flashed on your Motorola Moto Z Play (Addison) XT1635 smartphone. To confirm it go to Menu -> Settings -> System -> About Phone. Enjoy the new features of Android 8.0 Oreo with this custom ROM. Also, share your views and experience after using it.