
In this guide, we’ll Install TWRP Recovery on Galaxy A10. Galaxy J series was a major loss for Samsung since competitors like Xiaomi, Huawei, Vivo, Oppo, etc., offered better smartphones at affordable prices.
After this Samsung decided to deliver value-for-money smartphones in the Indian market. Soon after the launch of the Galaxy M Series, the company came up with a refreshed lineup of Galaxy A-Series smartphones.
These handsets were launched to deliver high-end specs at mid-range prices. In this easy step-by-step guide, we’ll root Galaxy A10, unlock the bootloader and install TWRP recovery.
Samsung Galaxy A10 launch date in India was February 2019. After this, the company started giving tough competition to its rivals. Galaxy A10 specifications include a 6.2 inches HD + Infinity V display with 720 x 1520 pixels of resolution.
Moreover, it is powered by Exynos 7884 Octa-core processor with 32GB storage and 2GB RAM. Furthermore, Galaxy A10 features decent cameras that can easily produce quality pictures.
To be specific, it sports a 13 MP primary camera. Whereas on the other hand, it offers a 5 MP front camera for selfies. For more detailed Samsung Galaxy A10 review and unboxing, visit YouTube.
Related: Install Android 10 ROM on Samsung Galaxy A10
On the contrary, the Samsung Galaxy A10 price in India starts from Rs. 8490 onward. You can easily buy Galaxy A10 from Amazon or Flipkart for exclusive offers. Do you want to Root Galaxy A10? Do you want to install a custom ROM on Galaxy A10?
If yes, you must install TWRP recovery on Galaxy A10 first. To flash TWRP, you only need an Odin tool or ADB drivers installed on your PC. Are you unable to root Android using Kingroot app?
Then don’t worry because, with the help of TWRP recovery, you can easily root any Android phone. Besides, you can also flash custom ROM, install the kernel, and mods like Xposed framework, Super SU, etc. Here in this tutorial, we’ll flash the latest TWRP recovery 3.2.3-0 on the Samsung Galaxy A10 SM-A105F smartphone.

How to Install TWRP Recovery on Galaxy A10
In this guide, we’ll use two methods to flash the TWRP custom recovery on the Samsung Galaxy A10 smartphone. Let’s get started.
Disclaimer
Proceed at your own risk. We at Droid Thunder will not be held liable for any damage caused to your device. It is strongly recommended to implement the steps given below carefully.
Requirements
- Charge your Galaxy A10 to a minimum of 50%.
- To recognize your mobile on the PC, install the latest Samsung USB drivers.
- Enable USB debugging from your phone settings.
- Take a backup of your contacts, apps, messages, call logs, notes, etc.
Steps to install TWRP Recovery on Galaxy A10
Here, we’ll first install the TWRP using the Odin Flash Tool. Later, we’ll use the ADB and Fastboot commands to do the same.
Method 1: Odin Tool
At first, we’ll use Odin Multi Downloader to flash the custom recovery on the Android device.
Downloads
Steps to Install TWRP Recovery on Galaxy A10
- Switch off your phone and boot it into download mode.
- For doing so, press and hold the Power button+ Volume down key simultaneously.
- Keeping the phone in download mode, connect it to the PC using a USB cable.
- Launch the downloaded Odin flash tool on your PC.
- The ID: COM section in Odin will turn blue.
- Also, an Added message will appear.
- This will verify the successful connection between your Galaxy A10 and PC.
- If such a thing doesn’t happen, that means your phone is not recognized by the PC.
- For that, fix the USB device not recognized error on your computer.
- Furthermore, tick the Auto Reboot and F.Reset Time options.
- Do not tick Re-partition or Nand Erase options as they might brick your Galaxy A10.
- Click on the AP tab and select the downloaded TWRP recovery.tar.md5 file.
- To initiate the TWRP flashing process, tap on the Start button.
- Be patient and wait until the flashing complete.
- It will hardly last for a few minutes.
- As soon as it finishes, the ID: COM section will turn green with a Pass message.
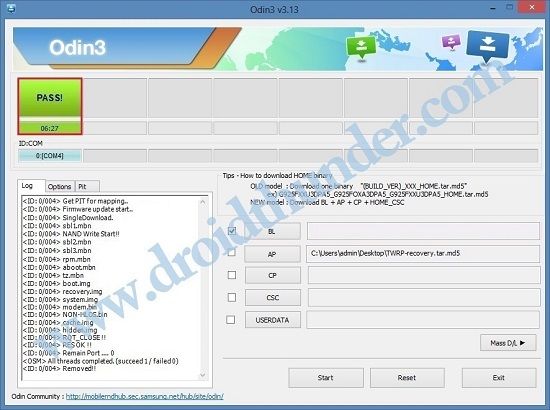
- If the process fails, then close Odin software, and repeat the complete process.
- Finally! You’ve successfully installed TWRP recovery on Samsung Galaxy A10 using the Odin flash tool.
Method 2: ADB & fastboot
In this method, we’ll use the command prompt window to flash the custom recovery on the Android phone.
Downloads
Steps to install TWRP Recovery on Galaxy A10
- Install ADB drivers on your computer.
- Copy the downloaded twrp.img file to the location C:\Program Files\Minimal ADB and Fastboot folder.
- Now connect your Galaxy A10 to PC using a standard USB cable.
- Go to C:\Program Files\Minimal ADB and Fastboot folder, hold the Shift button, and right mouse click on a space.
- You’ll see a list of options from which select the Open command window here option.
- This will open the cmd window.
- Type the following command in the cmd window and hit the enter key:
adb devices
- As soon as you press the enter key, you’ll see a message saying ‘List of devices attached’ along with some random numbers.
- Moreover, this will confirm a successful connection between your Galaxy A10 and the computer.
- If there are any connection problems, re-install Samsung USB drivers from the Pre-requisites section.
- Now type the below command to restart your device into Fastboot mode.
adb reboot bootloader
- To confirm whether Fastboot is functional or not, type the below command and hit enter:
fastboot devices
- Some random numbers along with the ‘List of devices attached’ message will verify that fastboot is functional.
- Besides, let’s flash the latest TWRP recovery on Galaxy A10 now.
- Finally, type the below command and press enter:
fastboot flash recovery twrp.img
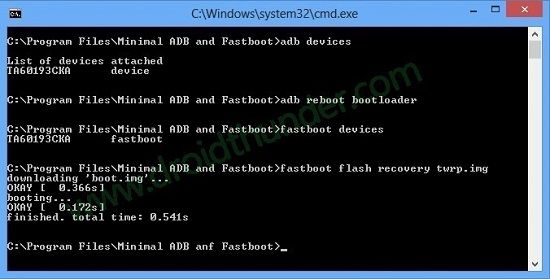
- Moreover, this will begin the TWRP recovery installation process.
- It will hardly take a few seconds to flash.
- Finally! This is how you can install TWRP recovery on a Galaxy A10 smartphone using ADB and Fastboot commands.
Steps to Boot Galaxy A10 into TWRP recovery mode
- Switch off your phone.
- Press and hold the Volume up key + Power button simultaneously.
- As you see the TWRP logo, leave both the keys.
- If you are not able to restart Galaxy A10 into recovery, use the TWRP Manager app from Google Play Store.
Wrapping Up
Finally! This is how you can install TWRP Recovery on Galaxy A10. At last, if you come across any difficulty, then kindly drop your comment below.


13 thoughts on “Install TWRP Recovery on Galaxy A10”
THANK YOU SO MUCH !
You’re welcome
Só achei Custom Rom é Root pro A105M…
Isso serve pro Modelo A10/A105M??? Pq pesquisei tanto é não encontrei nada sobre ele só root e Custom Roms! Até chegar aq, mais não sei se vai funcionar nesse modelo! Por favor manda uma resposta pra mim….
Sim, é para A10
Se puede instalar teniendo Ya android 10?
si
Amigo estou querendo uma custom rom Pro A105m , voçes tem?
Olá tenho um duvida , ja instalei o twrp no meu A10 e quero flashear o enable api2 . A minha duvida é se é necessário fazer root antes .
Obs: Não quero ter k fazer root .
My odin process has started and it showed log messages boot.img and after that recovery.img. After this it is stuck. Not proceeding further. What should I do?
We’ve updated the TWRP download links
Recovery: Error validating footer
At what step are you getting this error?