Boot Samsung Galaxy J7 Prime into Download Mode using our step-by-step tutorial. Download mode is a special state or we can say a sub-system of an Android device and is mainly used to flash stock firmware through official means. Once you enter your Galaxy J7 Prime into download mode, the system of your device will boot from external sources instead of the stock bootloader which will directly help you to replace the stock ROM on your device. Moreover, the download mode is also widely used to gain root access and install custom recovery, custom ROMs, boot loaders, kernels, modems, pit files, and system updates.

Samsung Galaxy J7 Prime, also known as Samsung Galaxy On Nxt or Samsung Galaxy On7 Prime has some breathtaking specs and features. These include a 5.5-inch PLS TFT screen with 1080 x 1920 pixels of resolution, an Octa-core 1.6 GHz Cortex-A53 Exynos Processor with 32 GB of internal storage, and 3 GB of RAM. It also features 13 megapixels of primary camera and 8 megapixels of front camera for selfies. It comes with Android 6.0.1 Marshmallow OS out of the box which is now upgradable to official Android 7.1.1 Nougat OS.
By entering your Samsung Galaxy J7 Prime into Download Mode, you can easily install the newly released Samsung OTA updates. You can easily flash them from your computer directly into your smartphone using only a USB data cable. Remember that for flashing an official stock firmware you’ll need a tool called Odin which must be installed on your computer. Below you can find the download links for all versions of Odin.
If you are installing ROM by entering your Galaxy J7 Prime into download mode, then you need the ROM package file in tar or tar.md5 format which can be flashed by the Odin tool from a computer. Note that Odin does not accept zip files which is completely different from flashing ROMs through recovery mode. Download Mode is essentially considered the same as Bootloader Mode.
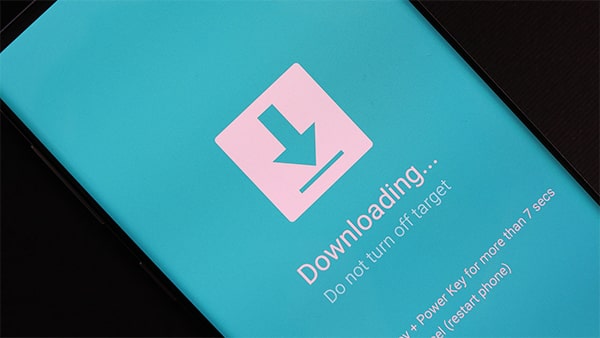
To enter the downloading mode, your phone doesn’t need to be rooted. Download mode, also called Odin mode can be entered on any smartphone or tablet irrespective of whether it is rooted or unrooted, whether it has custom ROM or stock ROM installed. To confirm that you’ve successfully booted your Galaxy J7 Prime into download mode, you’ll see a black/blue screen with an Android image in it that says “Downloading”.
There are different methods to boot your Galaxy J7 Prime into download mode. The universal method is by pressing and holding the hard keys/buttons. But what if your button is not working or is broken? Still, it is possible to boot your Galaxy J7 Prime into download mode. Entering Galaxy J7 Prime into download mode is one of the easiest tasks that any Android user can implement, as you just need to follow any of the instructions mentioned below. Here in this step-by-step guide, we’ll discuss four important methods on how to easily enter Galaxy J7 Prime into download mode with or without keys.
How to Enter Samsung Galaxy J7 Prime into Download Mode
Here we have mentioned 4 different ways to enter your Galaxy J7 Prime into download mode. You can refer to any one of them.
Note that these methods apply to all variants of Samsung Galaxy J7 Prime including SM-G610F, SM-G610F/DS, SM-G610F/DD, SM-G610M, SM-G610M/DS, SM-G610Y/DS.
Method 1: Using Hard Keys
Step 1: Switch off your Samsung Galaxy J7 Prime smartphone completely until it vibrates.
Step 2: Press and Hold the Volume Down key + Home button (middle button) + Power button simultaneously until you see a warning message. Leave all the keys as you see the warning message window.
Step 3: Now just press the Volume up button to continue.
This will directly land your Galaxy J7 Prime into download mode. That’s all! You’ve successfully booted your Galaxy J7 Prime into download mode using hard keys.
Method 2: Using ADB commands
ADB and Fastboot is a versatile command line tool that lets you communicate with your device when connected to the computer (Windows, Mac, or Linux) using a USB cable. Through these commands, you can perform various actions such as installing and debugging apps, backing up partitions, and many more. Let’s use this ADB and Fastboot method to boot your Samsung Galaxy J7 Prime into download mode.
Step 1: Firstly enable the USB debugging mode on your phone. To do so, follow the path Menu->Settings->Developer options ->USB debugging. If you don’t see the Developer option then go to Settings->About Phone and tap 7 times on the Build number. This will make the Developer option appear in the Settings menu.
Step 2: Also enable OEM unlocking and Advance reboot mode from the Developer options.
Step 3: Download and install ADB and Fastboot setup on your computer.
Step 4: Connect your Galaxy J7 Prime to your computer using a USB cable.
Step 5: Launch the Command window on your computer. To do so, hold the Shift button and right-mouse click anywhere on your PC. You’ll see a list of options from which select the Open command window here option. This will launch the command prompt window on your computer.
Step 6: Now to ensure that your Galaxy J7 Prime is properly connected to your computer or not, type the following commands in the command window and press enter key:
adb devices
As soon as you press the enter key, you’ll see a message saying ‘List of devices attached’ along with some random numbers. This will confirm that your Galaxy J7 Prime has properly connected to your computer.
Note: If such a thing doesn’t happen, then re-install device drivers, enable USB debugging mode, and try again. If the problem still persists, try changing the USB cable or even the USB port.
Step 7: Now to boot your Samsung Galaxy J7 Prime into download mode, type the following command in the command window and hit the enter key:
adb reboot download
As soon as you press the enter key, your Galaxy J7 Prime will boot into download mode.
Method 3: Using Terminal Emulator (Requires ROOT)
Terminal Emulator app helps you in accessing the Android’s built-in Linux command line shell.
This method requires root access on your phone.
Step 1: Download and install the Terminal Emulator App on your Samsung Galaxy J7 Prime smartphone.
Step 2: Launch the Terminal Emulator App.
Step 3: Type this command in it and press enter:
su
Step 4: As soon as you hit the enter key, a popup will appear to grant Superuser permissions. So click on the Grant option.
Step 5: On the next line type the following command and press enter:
reboot download
As soon as you hit the enter key, your Galaxy J7 Prime will enter into download mode.
Method 4: Using Quick Reboot App (Requires ROOT)
Quick Reboot app provides advanced reboot options to boot your Galaxy J7 Prime into download mode, recovery mode, normal reboot, fast reboot, safe mode, and much more.
This method also requires root access on your phone.
Step 1: Download and install the Quick Reboot app on your Samsung Galaxy J7 Prime smartphone.
Step 2: Launch the Quick Reboot app.
Step 3: Tick the ‘I have read and accept the terms’ and click on confirm.
Step 4: To boot into download mode, simply click on the Fastboot mode option.
Step 5: Then Tap on Yes to confirm.
Step 6: As soon as you hit Yes, a popup will appear to grant Superuser permissions. So click on the Grant option.
This will enter your Galaxy J7 Prime into download mode.
How to Exit (get out of) Download Mode
- For Android phones with a removable battery, you just need to open the back panel, remove and re-insert the battery, and then normally start the phone by pressing the Power button.
- For non-removable battery phones, long press + hold the Power button to exit the download mode and restart the device.
- For phones with Android 6.0 Marshmallow and above OS, Google has introduced a new process to exit the Download mode. For that, you need to press and hold the Power button + Volume Down key simultaneously until your device reboots.
I hope that this clears things up on how to enter and exit your Samsung Galaxy J7 Prime SM-G610F, SM-G610F/DS, SM-G610F/DD, SM-G610M, SM-G610M/DS, SM-G610Y/DS into Download Mode.
If you have any queries regarding the guide mentioned above, then do contact me through the comments section. It’ll be a pleasure to help you guys. Till then Keep Smiling and Peace Out!


