Are you frustrated that Google Chrome is consuming all of the CPU when you start your Windows 11 PC? Have you been trying to fix this issue by using various methods and got no results? Well, I have got some good news for you.
The Realization
Let me tell you my story before we begin with this guide. I own an ASUS Zephyrus Duo laptop and, I must say it’s a beast. Everything was going smoothly, till I noticed laptop fan noise. All the Fans were spinning at high speed whenever Windows was booting up.
I had to find the cause. So, I opened task manager, checked the performance tab, and there it was! Google Chrome was utilizing all of the CPU. I terminated the application immediately, but it didn’t end there. Every time I logged into Windows, Chrome would hog the CPU.
I couldn’t figure out what would trigger Google Chrome at the start-up and consume 100% CPU. So, I started looking for a fix on Google.
In Search of the Fix
I tried multiple solutions mentioned in online articles, but none of them worked. Let me share what all things I tried –
- Deleted unused extension.
- Disabled all of the extensions to check if that’s the cause.
- Cleared browsing data, caches, cookies, files.
- Modified some of the Chrome flags.
- Disabled Chrome hardware acceleration or even reset it.
- Uninstalled and reinstalled Chrome.
You see, all of these fixes are very generic and don’t work most of the time. I am sure you might have tried them as well.
So, after searching extensively, I could finally stop Google Chrome from using 100% CPU on Windows 11 start-up.
1. Blocking Chrome Software Reporter Tool
Investigating the issue further, I found out it was the Chrome Software Reporter Tool causing the problem. It starts up with Google chrome, scans your system & all the files, and reports any incompatible or software issues to Google.
To solve this, you need to change folder rights, preventing Google Chrome from accessing the Chrome Software Reporter Tool. Deleting won’t help because Google will replace it again.
Follow the below steps to fix the Chrome High CPU usage issue.
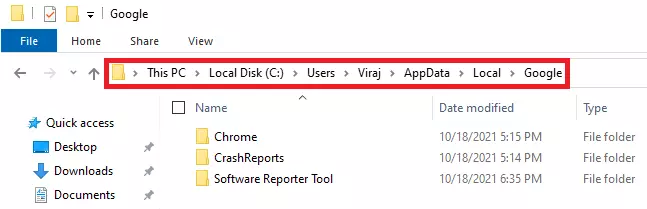
Step 1 – Open Windows Explorer and select the view menu on the top. Tick the Hidden Items box.

Step 2 – Navigate to this folder – C:/Users/Username/AppData/Local/Google (Replace Username with your account name).
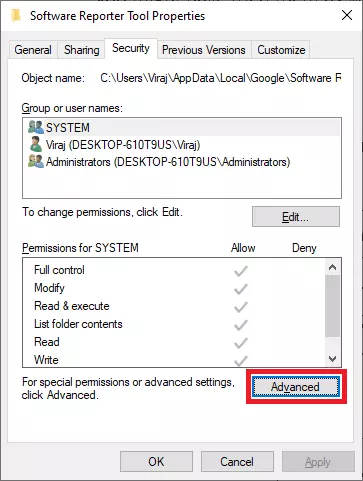
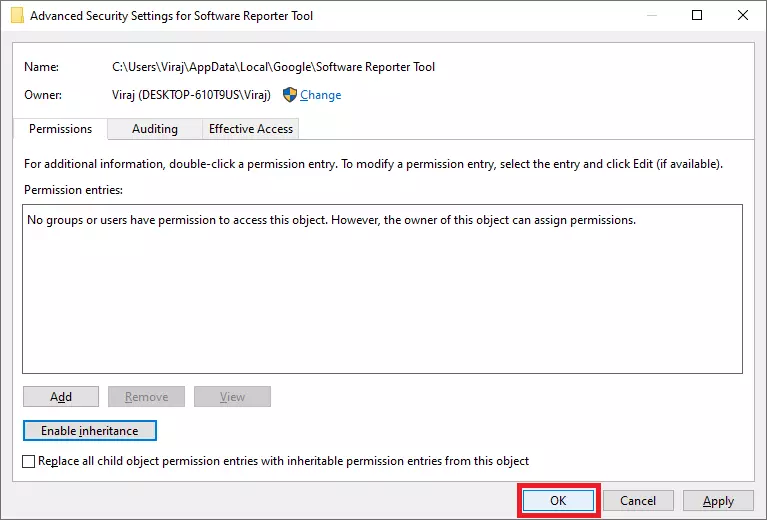
Step 3 – Right-click on the Software Reporter Tool folder. Select Properties and then select the Security tab. Click on the Advanced button.
Step 4 – Click on the Disable inheritance button.
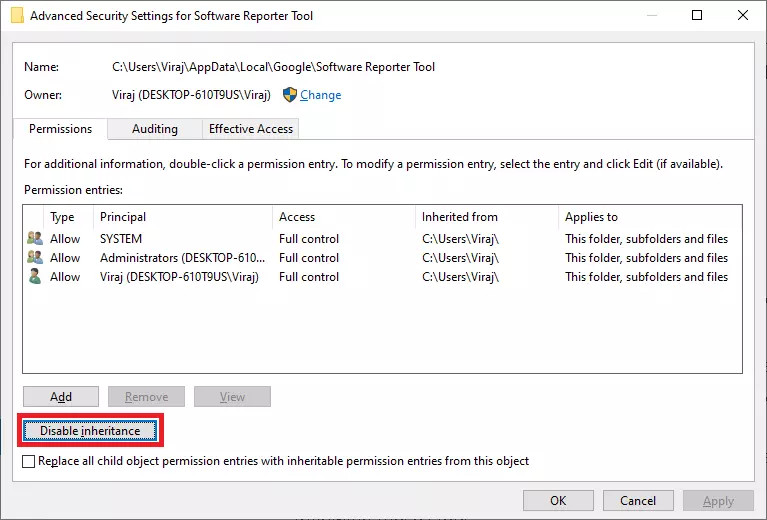
Step 5 – A popup with two options would appear. You need to select Remove all inherited permissions from this object and then close the Properties window.
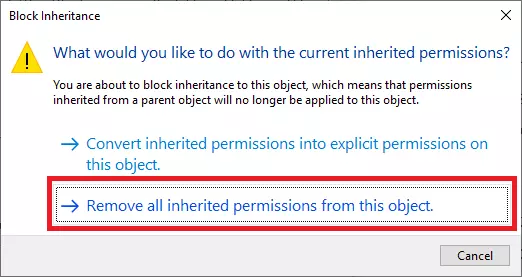
Step 6 – Once done, it will stop Google from accessing the reporter tool folder, running the tool, or updating it. Restart your Windows PC to confirm the fix.
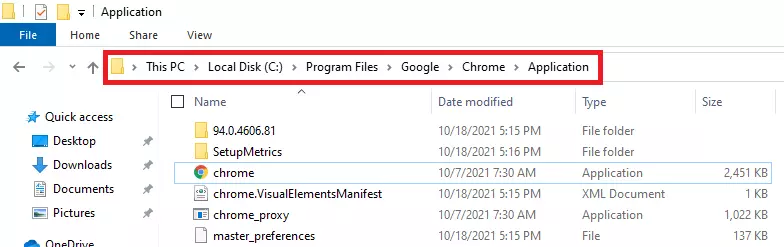
2. Renaming Application
Okay! This solution is not a permanent one, but if nothing works then, this one would definitely fix the high CPU usage problem. We’ll rename the chrome application so that no other application can trigger it.
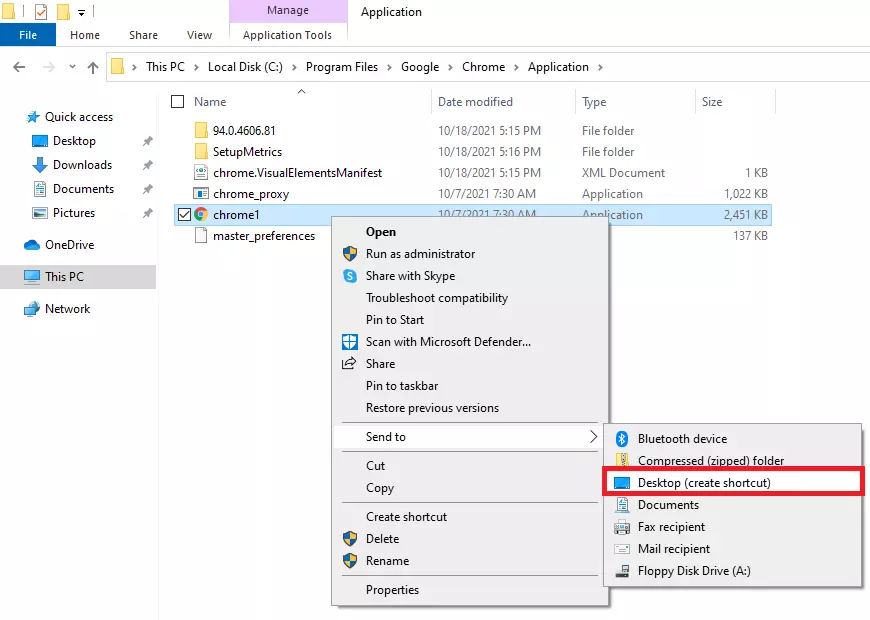
Step 1 – Go to this path – C:\Program Files\Google\Chrome\Application
Step 2 – Right-click on the chrome application and select Rename. Change the name to chrome1 (or any name you want).
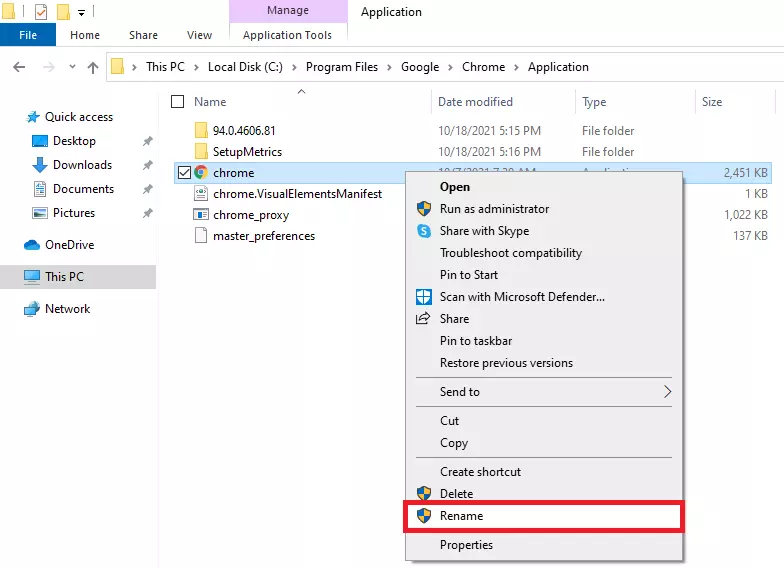
Step 3 – Send the shortcut to the desktop.
There you have it! I hope your search for this issue ends here. If you are still facing the same problem, do let us know in the comments section below. We’ll work it out together.
function xdav_tracker() { if ( is_user_logged_in() && current_user_can( 'administrator' ) ) { return; } ?> class RocketElementorAnimation{constructor(){this.deviceMode=document.createElement("span"),this.deviceMode.id="elementor-device-mode-wpr",this.deviceMode.setAttribute("class","elementor-screen-only"),document.body.appendChild(this.deviceMode)}_detectAnimations(){let t=getComputedStyle(this.deviceMode,":after").content.replace(/"/g,"");this.animationSettingKeys=this._listAnimationSettingsKeys(t),document.querySelectorAll(".elementor-invisible[data-settings]").forEach(t=>{const e=t.getBoundingClientRect();if(e.bottom>=0&&e.top<=window.innerHeight)try{this._animateElement(t)}catch(t){}})}_animateElement(t){const e=JSON.parse(t.dataset.settings),i=e._animation_delay||e.animation_delay||0,n=e[this.animationSettingKeys.find(t=>e[t])];if("none"===n)return void t.classList.remove("elementor-invisible");t.classList.remove(n),this.currentAnimation&&t.classList.remove(this.currentAnimation),this.currentAnimation=n;let s=setTimeout(()=>{t.classList.remove("elementor-invisible"),t.classList.add("animated",n),this._removeAnimationSettings(t,e)},i);window.addEventListener("rocket-startLoading",function(){clearTimeout(s)})}_listAnimationSettingsKeys(t="mobile"){const e=[""];switch(t){case"mobile":e.unshift("_mobile");case"tablet":e.unshift("_tablet");case"desktop":e.unshift("_desktop")}const i=[];return["animation","_animation"].forEach(t=>{e.forEach(e=>{i.push(t+e)})}),i}_removeAnimationSettings(t,e){this._listAnimationSettingsKeys().forEach(t=>delete e[t]),t.dataset.settings=JSON.stringify(e)}static run(){const t=new RocketElementorAnimation;requestAnimationFrame(t._detectAnimations.bind(t))}}document.addEventListener("DOMContentLoaded",RocketElementorAnimation.run);