
Various international payment gateways help to receive money from outside your country with minimal fees. Some of them include PayPal, Payoneer, Amazon Pay, Transferwise, and 2Checkout, etc. In this easy steps tutorial, we’ll guide you on how to set up Payoneer Account in any Country.
After the impact of coronavirus, everyone is working from home. Those people who have lost their jobs are looking for new ways to earn money online. Moreover, plenty of mobile apps and online platforms are giving an opportunity to make money by playing games or watching videos.

Using these apps, you can easily earn real money directly into your bank account. All you need is an international online payment service such as a Payoneer account. Whether you are a freelancer, blogger, or gamer, you need to register a Payoneer account to get cash from abroad.
What is Payoneer?
Payoneer is a NewYork-based financial services company that provides fast online money transfers, and digital payments. Especially bloggers and freelancers use this medium to get paid internationally. Payoneer is the best Paypal alternative with fewer transfer fees and more security.
Besides, if you own a Payoneer account, the company offers you a free MasterCard. You can use this Payoneer MasterCard to withdraw cash from any ATM machine. Many multinational companies such as Google, Amazon, Airbnb, and Fiverr use Payoneer as the payment method.
To sign up for Payoneer, you need a local Bank account. However, we have a trick that you can use to create a Payoneer account without a Bank account. But, the only drawback of this method is that you’ll not receive the signup bonus. All you need is a Fiverr, Upwork, Toptal, etc. account.
Most importantly, you can pay or receive money from any country worldwide. Over 200 countries support Payoneer including India, Pakistan, Nepal, Nigeria, Srilanka, Bangladesh, the United States, Australia, etc. The best thing is that it charges very little when it comes to money transfer rates.
Additionally, the company also provides a local bank account in the US, Japan, China, the UK, etc. Therefore, you can easily get direct deposit payments from these countries. This service is especially for freelancers, businesses, bloggers, digital marketers, service providers, and eCommerce-based portals.
Pros
- Fastest service to receive payments
- Supports 200 countries and 150 local currencies
- Send and withdraw money directly with a Debit card
- No Payoneer fees for receiving international transaction
- Supports payments using an E-check
- Requires no bank account for signup
- Provides mobile app service for easy transfers
- 24/7 customer support
- Free global payments between Payoneer accounts
Cons
- Higher exchange fees as compared to Paypal
- Requires $20,000 as a minimum monthly payment
- 2% to 2.75% currency conversion charge
- High Mastercard exchange rates for non-listed currency
- Lengthy signup process with lots of paperwork
Steps to Create a Payoneer Account
Let’s go through the easy step-by-step guide to register your Payoneer account.
Step 1: Getting Started
- Go to the Payoneer Signup Page.
- Click on the Sign Up for free button.
- Moving forward, ensure to select all the options accurately to ensure smooth account approval.
- Firstly, choose an option to select who you are, and what you are looking for.
- Here, I’ll select I’m a Freelancer or Digital Marketing Agency.
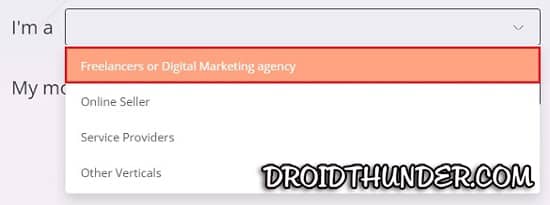
- The other options are online sellers, service providers, and other verticals.
- Select as per your requirement.
- Next, choose I’m looking to get paid by international clients or freelance marketplaces.
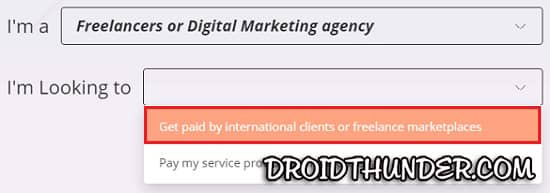
- If you want to pay someone, then select Pay my service providers and suppliers.
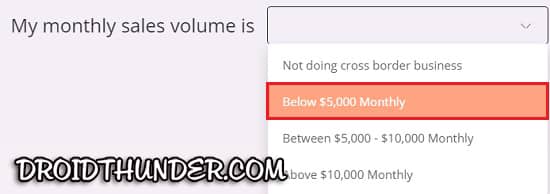
- Then the amount of monthly sales volume.
- Here, I’ll select the Below $5,000 monthly option.
- Now the actual sign-up process will begin.
- Here, you need to fill in the type of business and personal details.
- In case, if you are a blogger or a freelancer, then select the Individual option.

- But, if you own an organization then select the Company option.
- Remember that for a company, you must have an income tax return or a GST.
- Moreover, enter your first name, last name, email address, and date of birth. Then click Next.
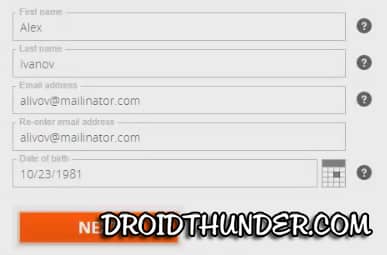
- Fill in the details as per your government-issued ID.
- Also, note that you should be over 18 years of age to apply for a Payoneer account.
Step 2: Contact Details
- On the next screen, select your Country, Address, City/Town, and Postal/ZIP code.
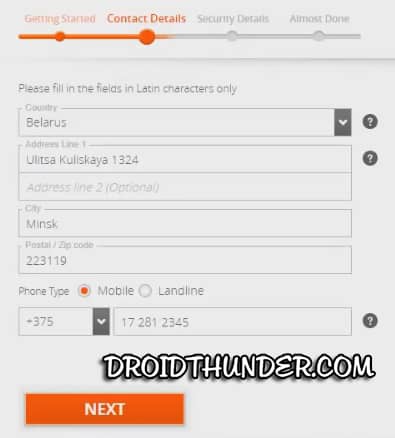
- Besides, also enter your current working Mobile number.
- Note that this number can be used later to retrieve a forgotten password or update details.
- You’ll receive a verification code on that mobile phone number.
- Simply enter the verification code with a 30 seconds time limit. Then click Next.
Step 3: Security Details
- On the next page, you need to fill in some security details.
- First, set a password to your Payoneer account.
- Furthermore, enter your identity document information.
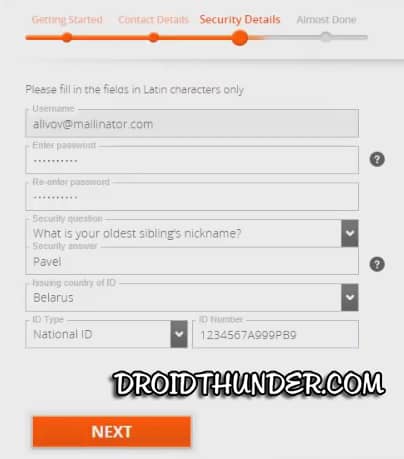
- This might include your national ID, passport, and driver’s license.
- Finally, enter the given captcha code.
- Then click Next to continue.
Step 4: Payment Method
- In this step, you need to enter the bank details to withdraw the Payoneer money.
- Therefore, type your Bank account type, currency, bank name, account name, and bank account number.

- Finally, agree to the terms, and click on the Submit button.
Step 5: Review in Progress
- That’s it! Your application is successfully submitted.
- Now, the review process will start.
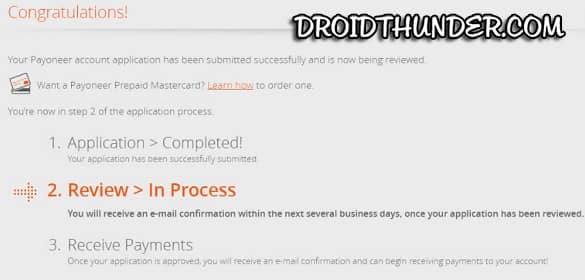
- After 3 business days, you’ll receive an email confirmation of the review.
Step 6: Submit Documents
- To complete the review process, it is important to keep your Payoneer account up to date with the right documentation.
- For that, sign in to Payoneer using your email address and password.
- Go to Settings > Verification Center.
- Here, you’ll receive a notification to submit the relevant documents.
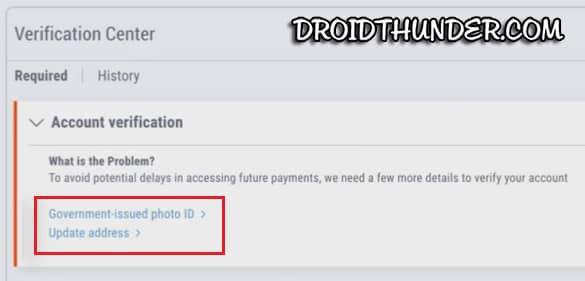
- This might include a government ID, passport, residence proof, driver’s license, electricity bill, and bank account verification.
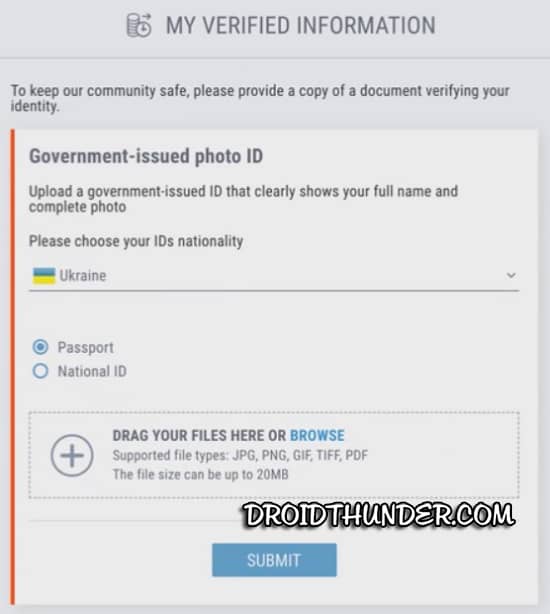
- Before submitting the documents, ensure that they are valid and not expired.
- Also, the document must be clearly visible. Do not submit a cropped image.
- Small-sized images and unclear documents might cause further delays.
- Upload the image in JPG, PNG, GIF, TIFF, and PDF formats.
- Moreover, make sure that the size of the document is less than 3MB.
- In the case of multiple documents, ensure to submit all of them separately.
- Finally, browse and upload the documents. Now click the Submit button.
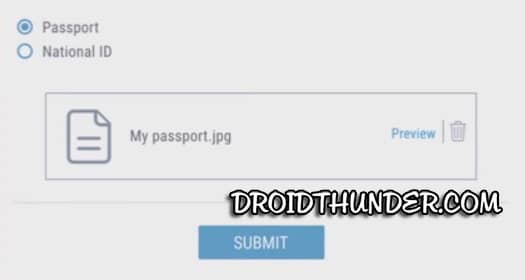
- A message saying the document successfully uploaded will appear on the screen.
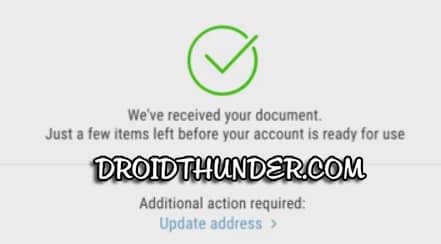
- Within a few business days, you’ll receive an email saying, ‘Your Payoneer account is successfully approved.’

Steps to Create a Payoneer Account without Bank Account
- Create an account on Fiverr.com.
- Go to the Settings menu and click on the Earnings under the Selling tab.
- On the next screen, click on the Withdrawal options.
- Out of the three Withdrawal options, open the Payoneer Bank Transfer.
- Go to the Payoneer registration page.
- Finally, complete the registration process.
- That’s it! This is how you can open a Payoneer account without a bank account.
- If you don’t have a Fiverr account, you can use any of the below-listed websites and sign up for Payoneer without adding the bank account details.
List of websites that pay through Payoneer
- Fiverr
- Upwork
- 99Designs
- Freelancer
- Amazon Affiliate Program
- PeoplePerHour
- TeeSpring
- Airbnb
- Envato
- Expert360
Wrapping Up
Overall, Payoneer is the best online payment solution that helps to withdraw online earned money/cash directly into your local bank account. You can use it on online shopping websites as well. If your country does not support Paypal, use Payoneer instead. Moreover, you no longer have to go through unsafe third-party payment services for any international online money transactions.


1 thought on “How to Create Payoneer Account”
I have been using Payoneer for a long time now, it’s my preferred gateway to get payments on Envato.