
Enable USB Debugging mode on Android 12L, 11, 10, Pie, Oreo, Nougat, Marshmallow, or any version using our easy steps guide. Enable developer options and USB debugging from a PC using this simple tutorial. USB Debugging (also called Developer mode or Android debug mode) connects an Android device and your computer using Android SDK.

You can easily turn on the Developer options or the USB debugging on any Android smartphone, including Samsung Galaxy phones, Google Pixel, Sony, Motorola, Xiaomi Redmi, Huawei, One Plus, Oppo, Vivo, HTC, Honor, Kindle fire, Asus, LG, Lenovo, Micromax and many more.
Also Read: How to Download Paid Apps For Free on Android
Using the ADB command prompt window or a few tricks, you can turn on the USB debugging mode on a broken screen phone, hard-bricked phone, dead phone, FRP-locked phone, password locked, black screen phone, boot-loop phone, etc. In this guide, we’ll discuss the step-by-step procedure for enabling USB debugging mode on any Android smartphone and tablet.
How to Enable USB Debugging
In this article, we’ll review every Android OS version and check how to enable USB debugging mode using easy steps.
Note: Android 12, Android 11, and Android 10 have similar steps as Android 9.0 mentioned below.
Disclaimer
USB Debugging is intended for development purposes only. Enabling it grants high-level access to your device, which is a kind of security risk. So it is recommended to enable it only when needed.
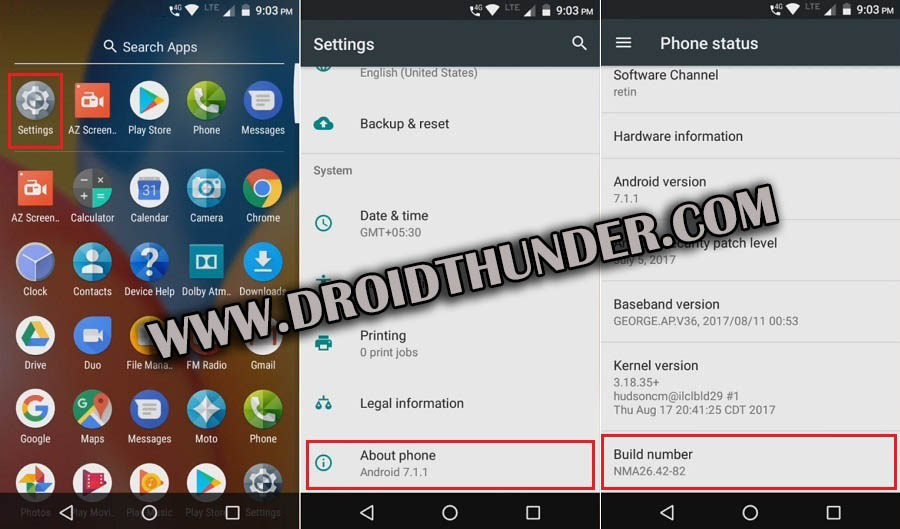
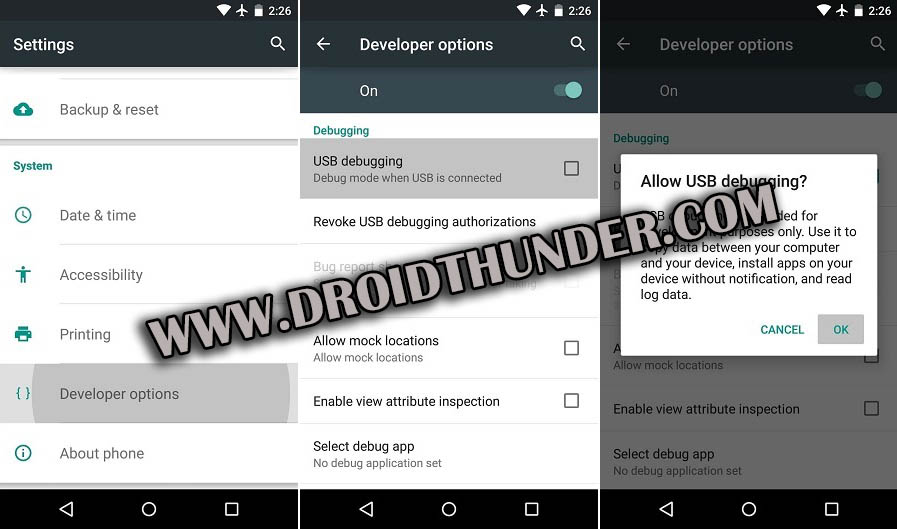
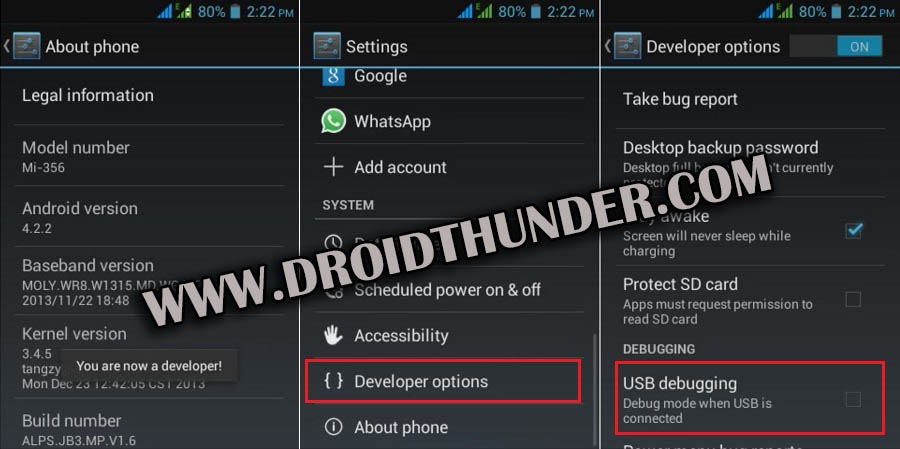
Android 9/10/11/12/13/14
USB debugging mode is available under the Developer options. But from Android 9 Pie, the developer options are hidden. So firstly, you need to unlock it to access the debugging mode.
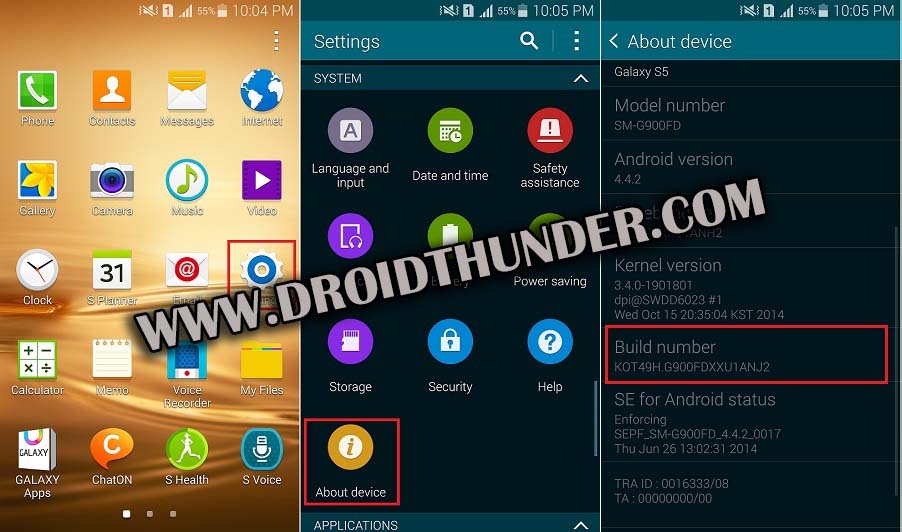
- Open the apps panel on your phone and launch the Settings app.
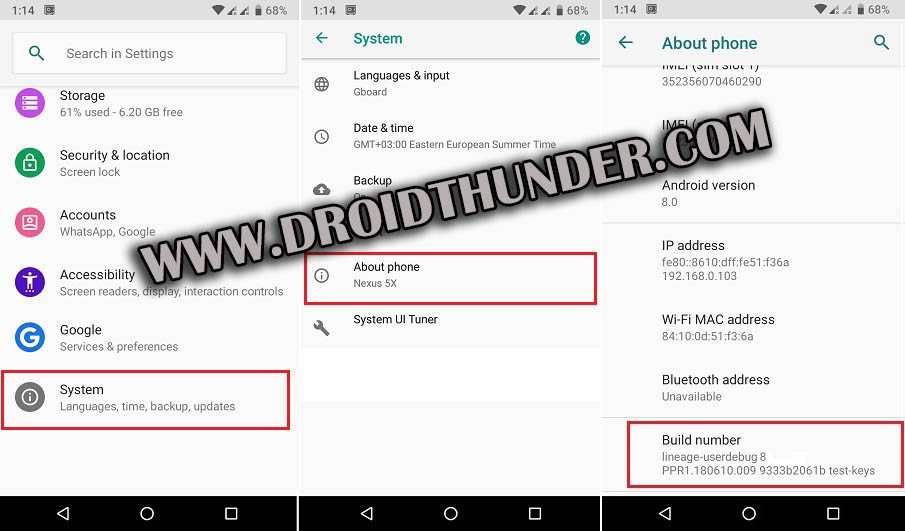
- On the next screen, scroll down to the bottom and open the System.
- In System, open the About Phone section.
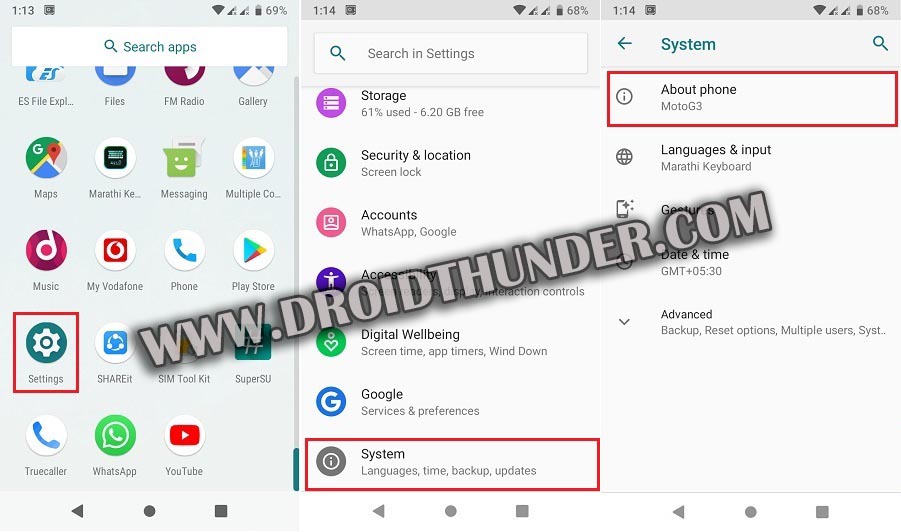
- Under the About Phone section, look for the Build number.
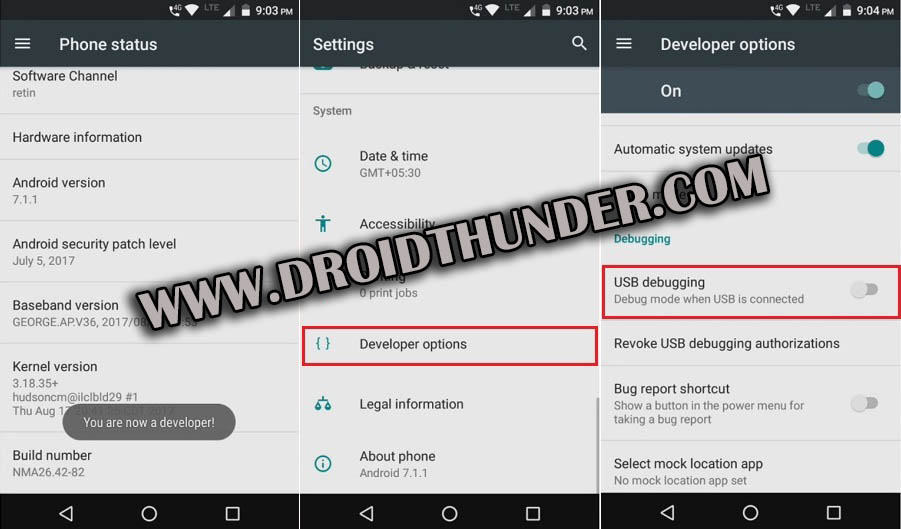
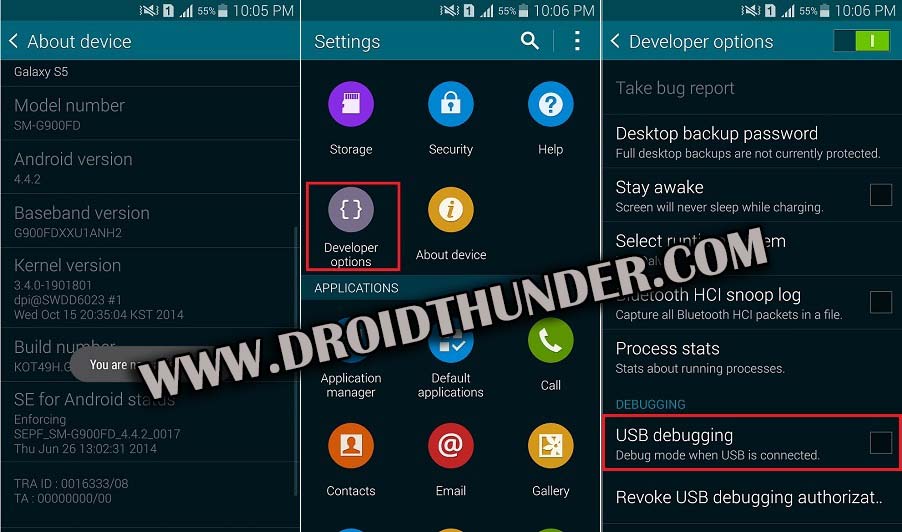
- Just tap on Build number 7 times. It’ll show you a countdown message saying, “You’re 4,3,2,1 steps away from being a Developer”.
- Tap on the Build number until it shows a message saying, ” You are now a developer”.
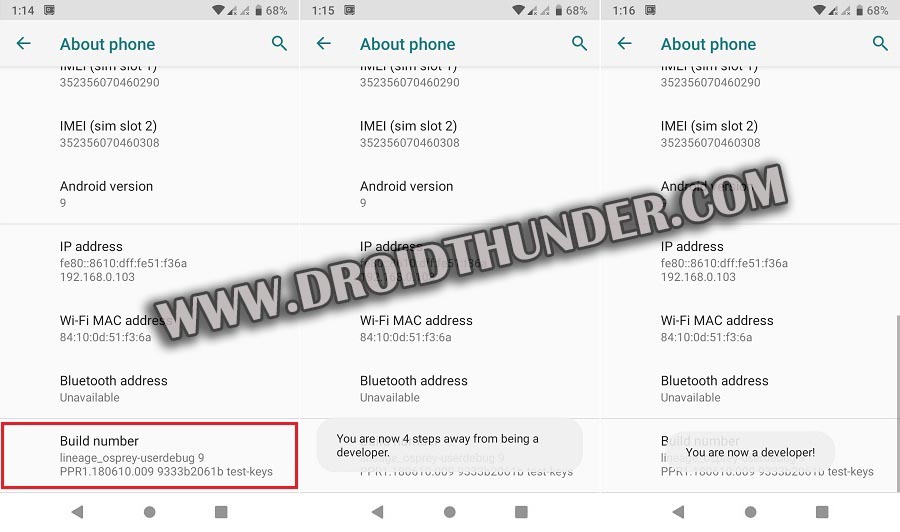
- Once you receive this message, the Developer options will be unlocked in your About Phone section.
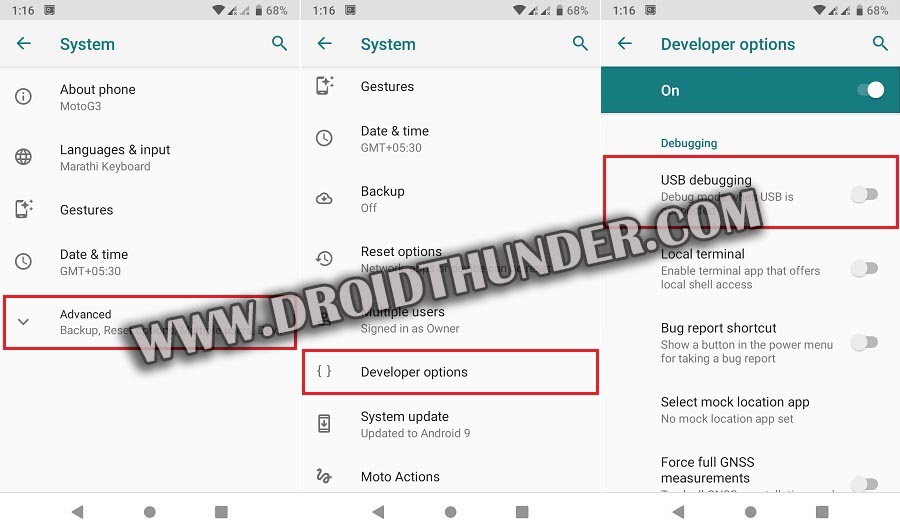
- So go back to the About phone section, and click on the Advanced option.
- The advanced options will not be available on some phones, so those phones directly go to the next step.
- Look for the Developer options and open it.
- Under Developer options, you can find and enable USB debugging mode.
Note: To disable USB Debugging and other developer options, slide the switch at the top of the screen to OFF.
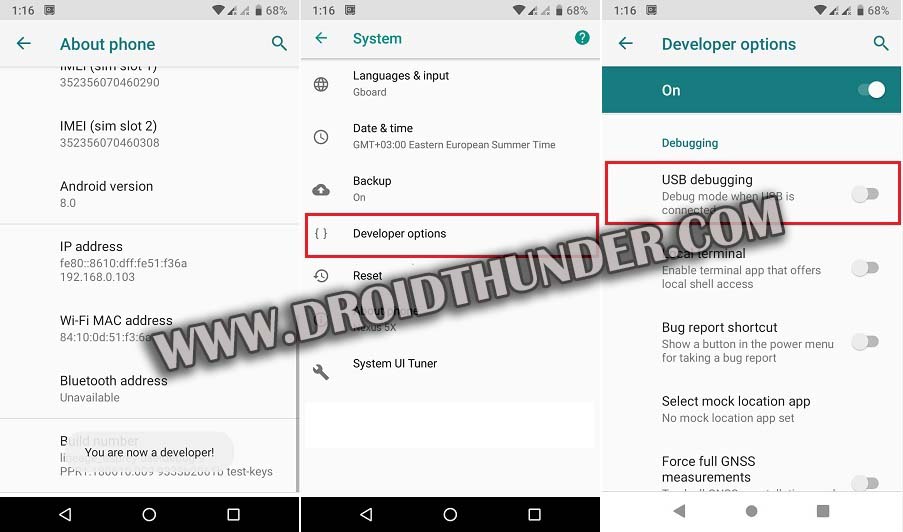
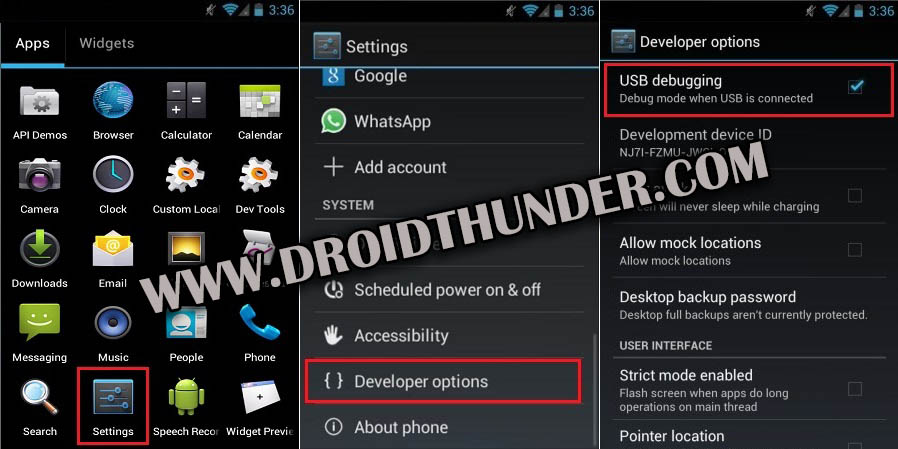
Android Oreo (8.0 and 8.1.0)
- Open the Settings of your phone.
- On the next screen, scroll down and open the System.
- Next, open the About phone section.
- Tap on the Build number 7 times until a message saying, “You are now a developer” appears.
- Go back and you’ll find the Developer option under the About phone section.
- Under Developer options, you’ll find the USB debugging.
Android Nougat (7.0, 7.1.1 and 7.1.2)
- In the Settings of your phone, open the About phone section.
- On the next screen, tap on the Build number 7 times until it says, “You are now a developer”.
- Go back in the Settings and open the Developer options.
- Look for the USB debugging mode to enable it.
Android Marshmallow (6.0 and 6.0.1)
- Open the About phone in your device settings.
- Just rapidly tap on the Build number until you become a developer.

- Go back to settings and open the Developer options.
- Enable USB debugging mode.

Android Lollipop (5.0 and 5.1.1)
- Open Settings » About Phone/Device on your device.
- Tap 7 times on the build number.
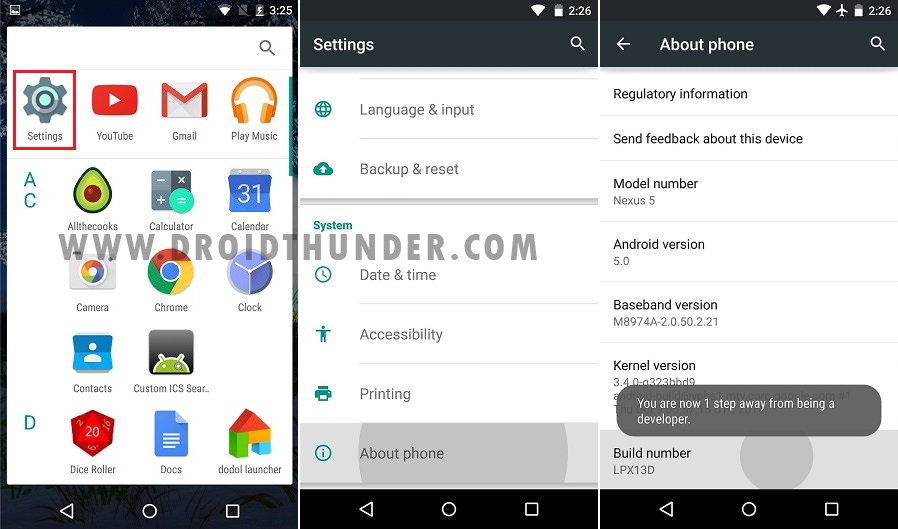
- Go back and open Developer options from Settings.
- Look for USB debugging mode and enable it.
Android KitKat (4.4 and 4.4.4)
- Navigate to Settings » About Phone » and tap the Build number seven times.
- Tap until you get a short pop-up in your display’s lower area, saying that you’re now a developer.
- Go back and open the Developer options menu, check ‘USB debugging’ and click OK on the prompt.
Android Jelly Bean (4.1, 4.2.2 and 4.3.1)
- From the App drawer, open the Settings app.
- In Settings, scroll down to the bottom and open About phone/device.
- On the next screen, locate the Build Number and tap on it seven times. This will activate the hidden developer option.
- Go back to Settings and click on developer options.
- Check the USB Debugging field to enable it.
Android ICS (4.0 and 4.0.4)
In Android ICS and below, the Developer option is not hidden and is available under Settings.
- Open the Settings of your device.
- In settings, open the Developer option and tick the USB debugging option on the next screen.
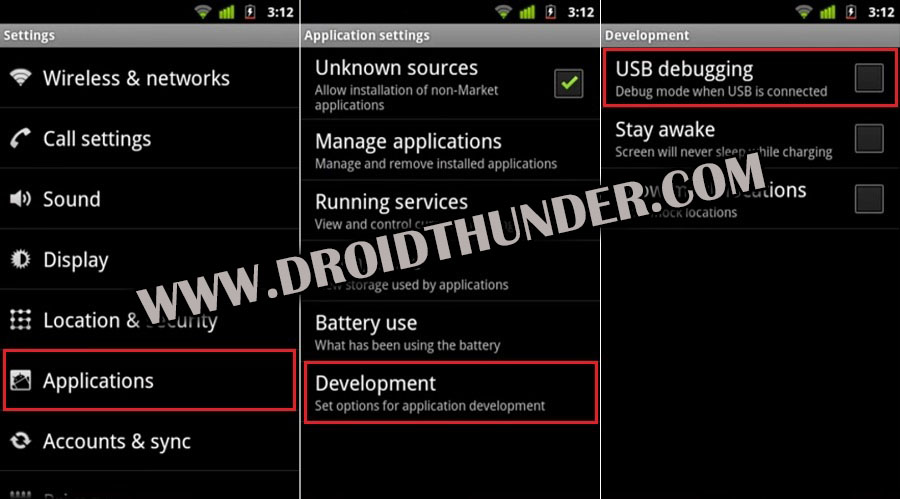
Android Gingerbread (2.3 and 2.3.6)
In Android Gingerbread, the step to turn on the USB debugging mode is slightly different.
- From the app drawer, open Settings.
- Click on Applications.
- On the next screen, click on Development.
- Under development, you’ll see the first option, USB debugging. Check it to enable it and click OK on the prompt.
- This is how you can enable USB debugging on Android 2.3 Gingerbread OS.
Conclusion
Finally! This is how you can enable USB Debugging on your Android smartphone or tablet. If you face any issues while going through this tutorial, then please comment below.


2 thoughts on “How to Enable USB Debugging Mode on Android”
You never went over the ADB command process.
merci de pense a moi svp