You might have heard about the word cache. In computer language, the cache is a storage location that temporarily stores data to load a website faster. It allows you to reuse the previously retrieved data. But what is DNS cache on Android and why clear this cache memory?
Cached data generally stores files, images, scripts, and multimedia from the visited website and applications. Whether it is Windows, Linux, Mac, Android, or iOS, every device and operating system has some kind of cache. Each device has a reserved space for caching purposes.
Sometimes, a website takes a long time to load than usual. Besides, some web pages show error connecting to server messages. This problem occurs due to the DNS cache corruption. At such times, you can flush DNS cache files on your Android device to easily fix the issue.
What is DNS Cache?
A DNS cache aka Domain Name Server resolver cache is a temporary database that collects and stores the recently visited websites and their IP addresses. Hence, in the future, if you try to re-visit the domain; the cached data will quickly load, thus making the browser speed faster.
How to Flush DNS Cache on Android phone
Here is the list of methods that can help you clear the DNS cache on your Android phone.
Method 1: Clear Browser Cache
The first trick is an easy way to delete the DNS cache on Android. Here we’ll clear the cache of the Android browser that you’re using.
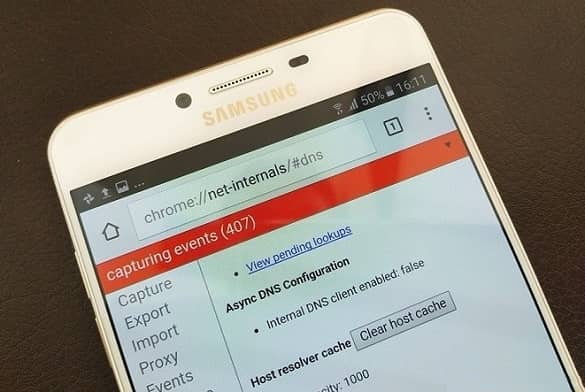
1. Flush DNS cache on Chrome
- Launch the Chrome browser on your Android phone.
- Type chrome://net-internals/#DNS in the Chrome address bar and press Enter.
- This will show you a list of domain name caches.
- Click on the Clear Host Cache button to flush the DNS cache in Chrome.
- Furthermore, tap on the drop-down button on the red bar.
- Then, select the Flush Sockets and Clear Cache options, and then again tap the Clear Host Cache button.
- Note that you can choose only one option at once. Hence, you need to reload the page twice.
2. Flush DNS cache in Mozilla Firefox
- On your Android phone, launch the Mozilla Firefox app.
- Click on the ⋮ icon on the top right corner and open Settings.
- On the next screen, tap on the Privacy button.
- Now, click on the Clear Now option. A pop-up screen will appear.
- Here, you can check or un-check the browsing history, downloads, form & search history, cookies & active logins, and saved passwords.
- At last, click on the Clear Data button to flush the DNS cache on the Mozilla Firefox browser.
3. Flush DNS cache in Opera for Android
- Open the Opera browser on your mobile phone.
- Tap on the Opera icon at the bottom of the app.
- Click on the Clear browsing data option.
- From the pop-up screen, you can tick or un-tick browsing history, cookies & data, and saved passwords.
- Finally, tap on the OK button to clear the DNS cache from the Opera Mini browser.
Method 3: Modify Wi-Fi Network
If you are using the internet through a WiFi network, you can easily flush the DNS cache by changing the DNS settings of the WiFi network. For doing so, follow the below steps:
- On your Android phone, go to Settings > WiFi.
- Long press on the WiFi network that you want to modify.
- Click on the Modify network option.
- A pop-up window will appear. Simply tap on the Advanced options button.
- Moreover, change the IP Settings to Static.
- Scroll down and manually enter the DNS address.
Method 4: Change DNS Settings in DNS Changer App
There are plenty of third-party apps to flush the DNS cache on Android. However, most of the application requires root access. Hence, we’ll use the Free DNS changer app that works without root and easily clears the cache files.
- Install the DNS Changer app on your Android device.
- Launch the application.
- From the main menu page, you can choose a particular DNS Provider.
- There are various DNS providers such as Google DNS, Open DNS, Yandex DNS, and Level3 DNS.
- You can also type your custom DNS address.
- Finally, click on the Start button to change the DNS settings.
- A connection request will pop up on your screen. Simply tap on the OK button.
Conclusion
Finally! This is how you can flush the DNS cache on Android smartphones and tablets. For any difficulty, kindly comment below.